
Square Foot Gardening Plan
Maximizing Space for a Thriving Garden
This post contains affiliate links. This means I may earn a small commission if you make a purchase through these links, at no additional cost to you. As an Amazon Associate (or other affiliate program), I earn from qualifying purchases. I only recommend products I personally use and love. Thank you for supporting Grown on a Hill!
If you want to grow a productive, low-maintenance garden while maximizing space, Square Foot Gardening (SFG) is the perfect solution. This method simplifies garden planning, reduces waste, and helps you get the most out of your available growing area. Whether you’re new to gardening or a seasoned grower, a well-structured Square Foot Gardening Plan ensures efficient use of every inch of soil.
What is Square Foot Gardening?
Square Foot Gardening is a method developed by Mel Bartholomew that divides a garden into small, manageable sections—typically 1-foot squares. These squares help organize plant spacing and allow for intensive planting, minimizing wasted space and simplifying garden maintenance.
Benefits of Square Foot Gardening
Maximizes space efficiency – Ideal for small gardens and raised beds.
Reduces weed growth – Closely spaced plants crowd out weeds.
Simplifies garden maintenance – Organized layout makes planting and harvesting easier.
Conserves water – Smaller spaces require less water than traditional row gardening.
Boosts productivity – Intensive planting yields higher crop outputs per square foot.
Planning Your Square Foot Garden
1. Choose the Right Location
A successful garden starts with proper placement. Select a spot that gets at least 6-8 hours of direct sunlight daily and has good drainage.
2. Build Your Raised Beds
Square Foot Gardening is commonly done in raised beds, typically 4x4 feet in size. Raised beds provide better soil control, improved drainage, and easier maintenance.
3. Create a Grid Layout
Using string, wood slats, or PVC pipes, divide your raised bed into 1x1-foot squares. This visual guide makes planting simple and ensures optimal plant spacing.
4. Select Your Plants and Spacing
Each square is planted according to the size and spacing needs of the chosen crops. Here’s a general spacing guide:
1 plant per square: Tomatoes, peppers, broccoli, cabbage
4 plants per square: Lettuce, spinach, Swiss chard, basil
9 plants per square: Beets, turnips, onions
16 plants per square: Carrots, radishes, scallions
5. Use Vertical Space for Climbing Plants
To maximize space, plant vining crops like peas, beans, cucumbers, and squash along trellises placed on the north side of the bed. This prevents them from shading smaller plants.
6. Soil Preparation and Maintenance
For the best results, use a mix of 1/3 compost, 1/3 peat moss, and 1/3 vermiculite to create nutrient-rich, well-draining soil. This combination retains moisture while providing essential nutrients.
7. Succession Planting for Continuous Harvests
Instead of planting all crops at once, stagger plantings every few weeks to ensure a continuous supply of fresh produce throughout the season.
8. Using the Seeding Square Tool
This year, my plan is to use Seeding Square - Seed and Seedling Spacer Tool for Bigger Harvests, Organized Plants & Fewer Weeds – Color-Coded Gardening Template with Magnetic Dibber, Ruler & Planting Guide. This tool helps to achieve precise plant spacing, leading to healthier growth, improved yields, and easier garden maintenance.
9. Incorporating Companion Planting
To further boost my garden’s productivity, I plan to incorporate companion planting. Companion planting helps plants support each other by deterring pests, improving soil health, and enhancing growth. Some of my planned combinations include:
Tomatoes with Basil – Basil enhances tomato flavor and repels pests.
Carrots with Onions – Onions deter carrot flies, making for healthier roots.
Lettuce with Radishes – Radishes help loosen the soil for lettuce roots.
Cabbage with Marigolds – Marigolds repel cabbage moths and aphids.
10. Homemade Seed Tapes for Easy Planting
To make planting even easier and more efficient, I’ll be using homemade seed tapes. These tapes ensure perfect spacing, making it simple to lay out seeds without overcrowding. If you’re interested in making your own, check out my blog post on DIY Homemade Seed Tapes for a step-by-step guide!
Final Thoughts
Square Foot Gardening makes gardening accessible, efficient, and rewarding. By integrating companion planting, I aim to create an even healthier and more productive garden this season. Whether you're working with a small backyard, patio, or community garden space, this method helps maximize yields while minimizing effort. By planning your garden layout now, you’ll be ready to plant confidently once the growing season begins!
Are you planning a Square Foot Garden this year? Share your layout ideas and favorite plant combinations in the comments below!


The Sunny Side Up:
Maximizing Sunlight in Your Garden Layout
As the winter winds blow and the cold keeps us indoors, now is the perfect time to plan next season’s garden. Planning your garden layout in advance ensures that you make the most of every square foot of space while giving your plants the sunlight they need to thrive.

Why Sunlight Matters in Garden Planning
Sunlight is a key factor in plant health. Most vegetables and flowers require full sun—defined as at least six hours of direct sunlight per day—to grow robustly. Some leafy greens and shade-tolerant plants can handle partial sun, but careful placement in your garden will determine how well your crops perform.
Observing Your Garden’s Sun Patterns
Before finalizing your garden layout, take note of the way sunlight moves through your space. Even in winter, you can:
Observe shadows cast by trees, fences, and buildings.
Track which areas receive the most sunlight during peak hours.
Consider how the angle of the sun changes throughout the growing season.
Planning Your Garden Layout for Maximum Sunlight
Since you’re using raised beds and vertical growing spaces, optimizing sunlight exposure is crucial. Here’s how to arrange your garden effectively:
1. Position Tall Crops Strategically
Tall plants like corn, tomatoes on trellises, and sunflowers should be placed on the north side of your garden beds. This prevents them from shading smaller plants that need full sun.
2. Layer Your Plants by Height
Consider a tiered planting approach:
North side – Tallest plants (corn, pole beans, sunflowers)
Middle – Medium-height crops (bush beans, peppers, eggplants)
South side – Shortest crops (herbs, lettuce, radishes) This method ensures that every plant gets its fair share of sunlight throughout the day.
3. Utilize Vertical Growing Spaces Wisely
Vertical gardening is a great way to maximize space but must be planned carefully to avoid shading nearby crops. Place trellises and vertical structures on the north or west side to reduce the impact of shade on lower-growing plants.
4. Consider Companion Planting for Shade Tolerance
Some crops benefit from a little shade during the hottest parts of the day. Pair sun-loving plants with those that can tolerate partial shade:
Tomatoes with basil and lettuce
Corn with squash and beans (Three Sisters method)
Peppers with spinach or cilantro
5. Use Reflective Surfaces to Your Advantage
If parts of your garden receive less direct sunlight, consider using light-colored mulch, reflective materials, or positioning plants near light-reflecting surfaces like white walls or fences to bounce sunlight onto your crops.
Incorporating Square Foot Gardening
Since you’ll be following a Square Foot Gardening Plan, each section of your raised beds will be carefully planned. This method ensures efficient space usage while optimizing plant growth. Square Foot Gardening Plan: Maximizing Space for a Thriving Garden
Starting Your Seed Tapes
Once your garden layout is planned, it’s time to start preparing your homemade seed tapes. Seed tapes help with even spacing and reduce the need for thinning later on. (Read my post on DIY Seed Tape for a step-by-step guide.)
Final Thoughts
A well-planned garden layout will save you time, effort, and frustration throughout the growing season. By considering sunlight exposure, plant height, and strategic placement, you can create a thriving, productive garden.
Are you already planning your garden for the upcoming season? Share your layout ideas and tips in the comments below!


Resources:
The Ultimate Summer Harvest Square Foot Garden
(6x3 Raised Bed Layout)
Square Foot Gardening (SFG) is an efficient and easy method for growing vegetables in a small space while maximizing yield. By dividing a raised bed into 1-foot sections, SFG reduces maintenance, optimizes plant spacing, and improves soil health.
In this guide, we introduce the 6x3 Summer Harvest Layout, a high-yield plan for summer crops like tomatoes, cucumbers, zucchini, and beans. This layout utilizes efficient spacing, companion planting, and trellising to ensure season-long production in a compact area.
What is Square Foot Gardening?
Square Foot Gardening (SFG) is a method of growing plants in a grid of 1-foot sections within a raised bed. This approach offers several benefits:
Less Weeding – The dense planting pattern shades out weeds.
More Plants in Less Space – Proper spacing maximizes productivity.
Easy Maintenance – Defined sections make planning and planting simple.
Healthier Soil – Rotating crops prevents nutrient depletion and soil degradation.
A 6x3 raised bed (6 feet long, 3 feet wide) is an excellent size for both beginners and experienced gardeners, offering a manageable area while accommodating a variety of crops.
6x3 Square Foot Garden Layout for Maximum Summer Harvest
The following layout is designed for optimal summer production:
Why This Layout Works Best
✅ Maximizes Summer Growth – Tomatoes, cucumbers, zucchini, and beans thrive in warm weather. ✅ Continuous Harvest – Lettuce, beans, and basil provide multiple pickings. ✅ Trellising Saves Space – Cucumbers, tomatoes, and beans grow vertically, freeing up ground space. ✅ Companion Planting Benefits:
Onions repel pests and don’t compete for nutrients.
Basil enhances tomato flavor and deters bugs.
Beans fix nitrogen in the soil, benefiting peppers. ✅ No Nutrient Competition – Onions replace heavy feeders like broccoli, preventing conflicts with cucumbers and zucchini. ✅ Balanced Watering Needs – Peppers and cucumbers are spaced apart to avoid moisture competition.
How to Plant Your Summer Harvest Garden
1. Prepare Your Raised Bed
Choose a full-sun location (6+ hours of direct sunlight).
Use Mel’s Mix (1/3 compost, 1/3 peat moss, 1/3 vermiculite) for ideal soil conditions.
2. Install a Trellis on the Back Side
A sturdy trellis supports cucumbers, tomatoes, and pole beans.
Growing vertically prevents plants from sprawling and saves space.
3. Follow the Planting Grid
Trellis crops (cucumbers, beans, tomatoes) go along the back row.
Sprawling crops (zucchini) are placed in corners to avoid crowding.
Lettuce & basil are near beans for natural shade.
4. Water & Mulch Properly
Keep soil evenly moist, especially for cucumbers and lettuce.
Add straw mulch to retain moisture and prevent weeds.
5. Harvest & Replant
Lettuce, basil, and beans allow for multiple harvests.
Rotate crops each season to maintain soil health.
Common Mistakes to Avoid in Square Foot Gardening
❌ Overcrowding plants – Follow spacing guidelines for optimal growth. ❌ Ignoring soil health – Refresh compost each season for nutrient replenishment. ❌ Not using trellises – Cucumbers and beans need support to prevent sprawling. ❌ Inconsistent watering – Raised beds dry out faster; monitor soil moisture regularly.
Final Thoughts: Get Started with Your Own Summer Harvest Garden!
With this 6x3 Square Foot Garden Layout, you can enjoy a bountiful summer harvest in a small space. This method is perfect for beginners and experienced gardeners alike, offering efficient plant spacing, season-long production, and minimal maintenance.

Resources:
Beginner’s Guide to Square Foot Gardening:
Easy 6x3 Salad & Stir-Fry Garden Layout
This post contains affiliate links. This means I may earn a small commission if you make a purchase through these links, at no additional cost to you. As an Amazon Associate (or other affiliate program), I earn from qualifying purchases. I only recommend products I personally use and love. Thank you for supporting Grown on a Hill!
Square Foot Gardening (SFG) is a simple, efficient gardening method perfect for beginners. This technique maximizes yield in small spaces by dividing a garden bed into square-foot sections. Our easy 6x3 raised bed layout is ideal for growing fresh salad greens and stir-fry ingredients while saving space and minimizing maintenance.
What is Square Foot Gardening?
Square Foot Gardening (SFG) involves dividing a garden bed into 1-foot square sections to optimize planting and maximize space. This method reduces weeding, ensures efficient soil use, and simplifies crop rotation. A 6x3 raised bed is particularly well-suited for small spaces, making gardening accessible to urban and suburban gardeners alike.
Beginner-Friendly 6x3 Square Foot Garden Layout
| 🥕 Carrots (16) | 🥕 Carrots (16) | 🥬 Lettuce (4) | 🥬 Lettuce (4) | 🥦 Bok Choy (4) | 🥦 Bok Choy (4) |
| 🌱 Radish (16) | 🌱 Radish (16) | 🧅 Green Onion (16) | 🧅 Green Onion (16) | 🥬 Cabbage (1) | 🥬 Cabbage (1) |
| 🌿 Basil (4) | 🌿 Cilantro (4) | 🌶️ Bell Pepper (1) | 🌶️ Bell Pepper (1) | 🥒 Cucumber (1, trellis) | 🥒 Cucumber (1, trellis) |
Plants per Square Foot:
Carrots: 16 per square
Lettuce: 4 per square
Bok Choy: 4 per square
Radish: 16 per square
Green Onion: 16 per square
Cabbage: 1 per square
Basil & Cilantro: 4 per square
Bell Peppers: 1 per square
Cucumbers: 1 per square (grown on a trellis)
Why This Layout Works Well
✔️ Easy Access to Trellis: Cucumbers are placed at the far end for better support. ✔️ Fast Growth + Long-Term Crops: Quick-growing greens like lettuce and radishes grow alongside slower crops like cabbage and peppers. ✔️ High Yield in Small Space: Maximizes production with dense plantings. ✔️ Companion Planting: Basil near peppers, green onions near lettuce, and radishes with carrots support plant health.
Step-by-Step Guide to Planting This Garden
1. Prepare Your Raised Bed:
Choose a sunny location with at least 6 hours of sunlight.
Learn more on how I filled my raised beds - Upgrade Your Garden: Why Metal Raised Beds Are Better Than Pallet Wood Beds
2. Set Up Your Square Foot Grid:
Divide the 6x3 bed into 18 squares using wood slats or string.
3. Plant According to the Grid:
Follow the spacing guide to maximize your harvest.
Trellis cucumbers at the back for vertical growth.
4. Water & Mulch Properly:
Deep watering promotes strong root growth.
Use straw mulch to retain moisture and prevent weeds.
5. Harvest & Replant:
Lettuce, radishes, and green onions can be harvested multiple times.
Rotate crops each season for healthy soil.
Common Mistakes to Avoid in Square Foot Gardening
❌ Overcrowding plants – Follow spacing guidelines for best growth. ❌ Ignoring soil health – Refresh compost each season. ❌ Not using vertical space – Always trellis vining crops. ❌ Inconsistent watering – Raised beds dry out faster, so monitor moisture levels.

DIY Homemade Seed Tapes:
A Winter Gardening Project
My mom was an amazing gardener. I learned so many things from her, and one key crop she always made seed tapes for was sweet corn. Once you have your Square Foot Garden designed, a wonderful winter project is preparing homemade seed tapes. This simple DIY task saves money, ensures precise seed placement, and makes spring planting a breeze. My mom would make seed tapes for all her vegetables planted in-ground, and now I carry on the tradition to make gardening even easier.

Why Make Homemade Seed Tapes?
Cost Savings: Store-bought seed tapes can be expensive, but making your own is budget-friendly.
Precise Seed Placement: No need for thinning seedlings later, as the seeds are already spaced correctly.
Time-Saving: When planting time comes, simply lay out the seed tapes and cover them with soil.
Ideal for Small Seeds: Carrots, lettuce, radishes, and other tiny seeds benefit from controlled spacing.
What You Need:
Seeds (carrots, radishes, lettuce, etc.)
Thin strips of biodegradable paper (toilet paper or paper towels work well)
Flour and water (to make seed glue)
A small brush, toothpick, or cotton swab
Scissors
A ruler
A marker (for labeling the tapes)
How to Make Seed Glue
Alternatively, instead of just making seed tapes, you can use a full sheet of paper towel to create a seed placement mat. This method allows you to align seeds precisely with your Square Foot Garden Plan by marking the grid directly on the paper towel. The seeds can then be glued in place, matching the intended layout for easy transplanting into raised beds. Instead of using commercial adhesives, a simple flour-based glue works best and is safe for plants:
Seed Glue Recipe:
Mix 1 tablespoon of flour with 2 tablespoons of water in a small bowl.
Stir until it forms a smooth, paste-like consistency.
If needed, add a few drops of water to thin the mixture slightly.
Your natural seed glue is now ready to use!
Step-by-Step Guide to Making Seed Tapes and Mats
Cut Paper Strips: Cut toilet paper or paper towels into long, 1-inch-wide strips.
Mark Spacing: Using a ruler, mark dots along the strip at appropriate seed spacing (e.g., 1 inch for carrots, 2 inches for radishes).
Apply Seed Glue: Dab a tiny drop of flour glue at each marked spot.
Place the Seeds: Using a toothpick or tweezers, place one seed onto each glue dot.
Let it Dry: Allow the strips to dry completely (usually takes 1-2 hours).
Store the Seed Tapes: Roll them loosely and place them in a labeled envelope or airtight container until planting time.
Storing Your Seed Tapes
To keep your seed tapes in the best condition before planting:
Store them in a dry, cool place.
Use a labeled envelope or small storage box to keep them organized by plant type.
Avoid exposure to moisture to prevent premature breakdown of the paper.
Seed tapes can last for several months if stored properly.
Planting with Seed Tapes
When planting time arrives:
Prepare your soil as usual.
Lay the seed tapes flat on the soil surface.
Cover lightly with soil (as directed for each seed type).
Water gently to moisten the paper and help it dissolve.
Final Thoughts
Homemade seed tapes are an easy, cost-effective way to improve your gardening efficiency while reducing seed waste. Plus, making them is a fun and rewarding winter project! By preparing now, you’ll be ready to plant effortlessly in the spring.
Have you ever tried making your own seed tapes? Share your experiences and favorite seeds for taping in the comments below!
Read More

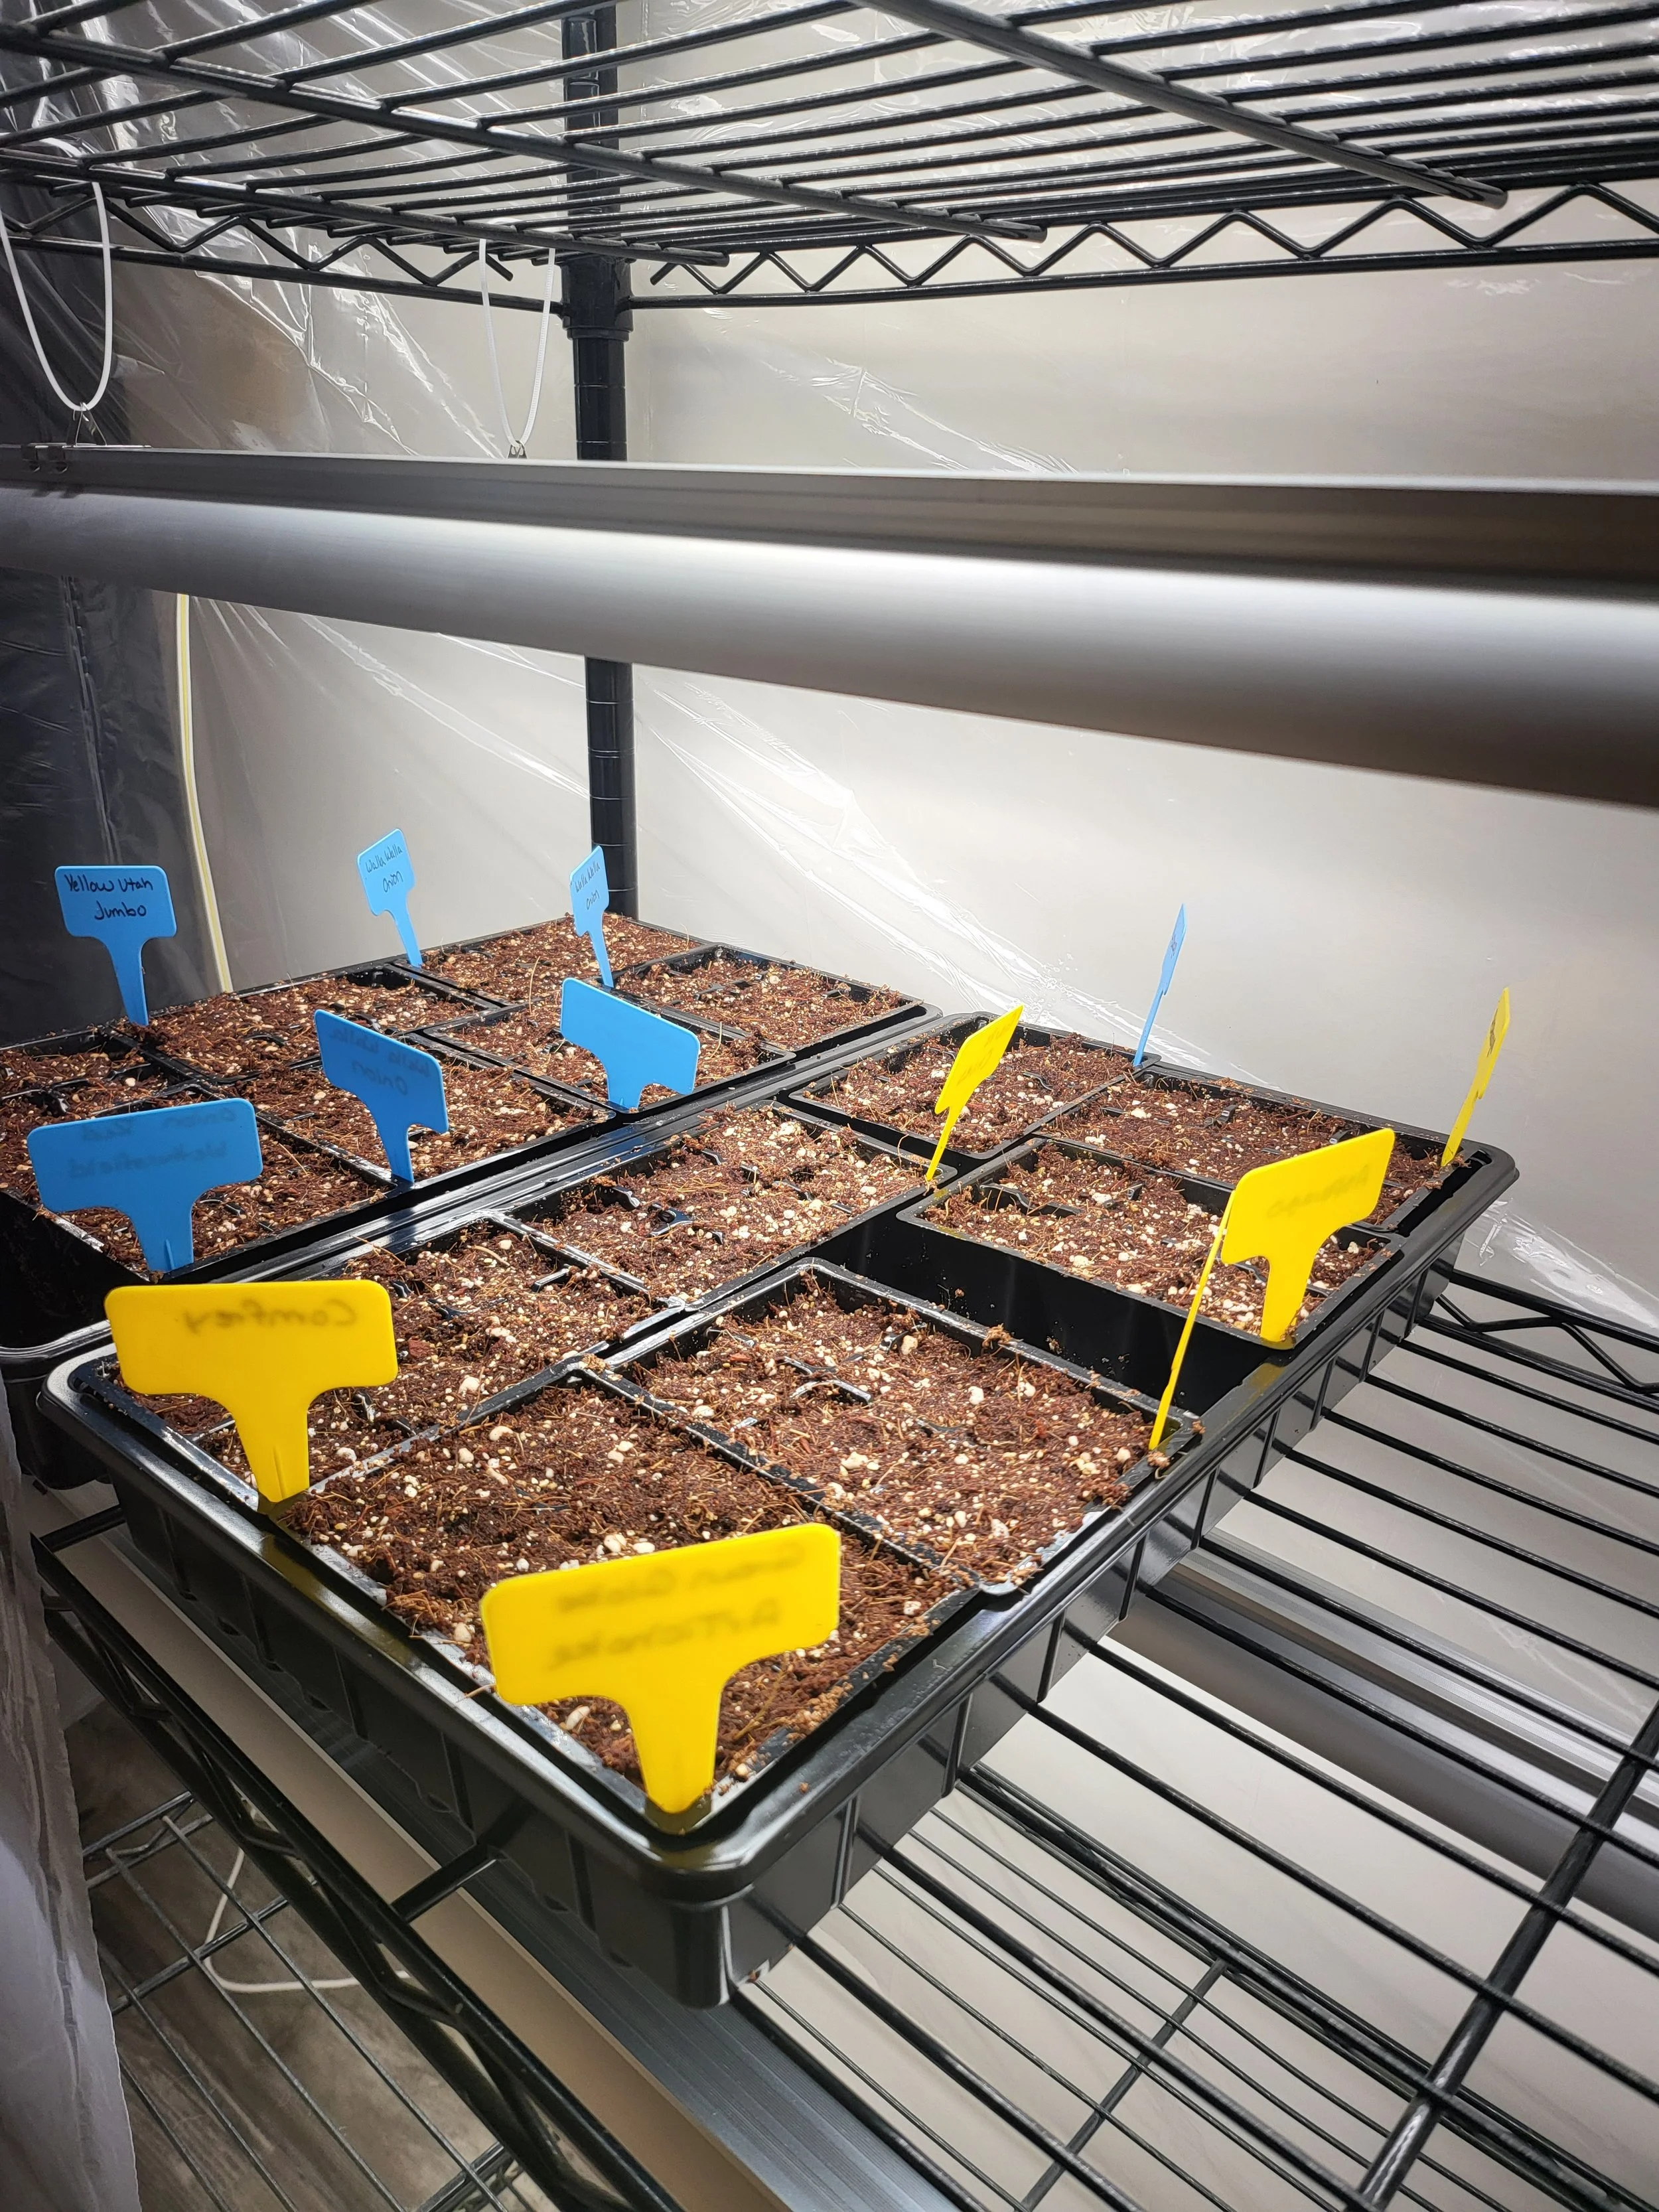
Building My New Basement Plant Station for Growing Seedlings
This post contains affiliate links. This means I may earn a small commission if you make a purchase through these links, at no additional cost to you. As an Amazon Associate (or other affiliate program), I earn from qualifying purchases. I only recommend products I personally use and love. Thank you for supporting Grown on a Hill!
As an avid gardener, I know that successful gardening starts long before the first seed is planted outdoors. Seed-starting is one of the most exciting parts of the process for me, and this year, I decided it was time for an upgrade. I wanted a more efficient and organized system to grow seedlings in my basement—something functional, space-saving, and optimized for success.
After a brief discussion with my husband and a look around at what we already had, inspiration struck: why not repurpose one of our 5-tier shelving units as the backbone for my new plant station? It was sturdy, spacious, and perfectly suited for the job. With a solid plan in mind, I got to work on gathering the materials and tools I needed to make this vision a reality.
The Supplies: Building the Perfect Setup
To turn my shelving unit into the ultimate plant station, I needed to outfit it with the right tools to create an ideal growing environment. After some research, I ordered a few key items from Amazon:
Barrina Plant Grow Lights
These 4FT 5000K full-spectrum white LED grow lights (6-pack) are game-changers for indoor gardening. They’re bright, energy-efficient, and mimic natural sunlight, which is crucial for healthy seedling growth. I plan to install them on multiple tiers of the shelving unit to ensure even light distribution.NEARPOW Digital Timers
Proper light cycles are critical for seedlings, so I invested in a [2-pack] of NEARPOW digital timers. These programmable timers come with dual outlets, 10 customizable on/off programs, and a 7-day scheduling feature. With these, I can automate my lights and keep everything running like clockwork.Comfort Zone Portable Clip-on Fan
Air circulation is just as important as light. Without it, seedlings can grow weak and be susceptible to damping off (a fungal disease). The Comfort Zone portable clip-on fan is small but mighty, with two speeds and adjustable tilt, making it easy to direct airflow exactly where it’s needed.Plastic Sheeting for Enclosure
To maintain the ideal temperature and humidity, I decided to repurpose some leftover plastic sheeting from winterizing our 3-season porch windows. This was a simple yet effective solution to create a mini greenhouse effect around the shelving unit, ensuring my seedlings stay cozy and protected from drafts.
The Setup: Transforming a Shelving Unit
The beauty of using a shelving unit as a plant station is its simplicity. The multiple tiers provide ample space for different trays of seedlings, and the open structure makes it easy to attach lights, fans, and other equipment.
Here’s how I assembled it:
Step 1: Installing Grow Lights
I mounted the Barrina LED grow lights to the underside of each shelf using the included clips and zip ties. This setup allows the light to shine directly onto the trays below, ensuring the seedlings get maximum exposure.Step 2: Setting Up the Timers
Next, I plugged the grow lights into the NEARPOW timers and programmed them for a 16-hour on/8-hour off light cycle, which is ideal for seedlings. This automation means I don’t have to worry about manually turning the lights on and off.Step 3: Adding Airflow
The clip-on fan was attached to the side of the shelving unit, angled to provide gentle airflow across all the trays. This not only strengthens the seedlings but also prevents moisture buildup, which could lead to mold or mildew.Step 4: Creating an Enclosure
I used the plastic sheeting to wrap the entire shelving unit, leaving an opening for easy access. This simple enclosure helps maintain consistent humidity and temperature, creating a greenhouse-like environment for my seedlings.


Connecting the Dots: Seed Starting Success
Setting up this plant station is just one piece of the puzzle. If you’re planning to start seeds this year, you’ll also need the right seed-starting mix and a clear plan for your growing season.
Check out my earlier post on The Perfect Seed Starting Mix, where I dive into what makes a good mix, the ingredients to look for, and how to prepare it for success.
You can also follow along with my Seed Starting Journey for 2025, where I’ll document everything I’m growing this year and share updates on the progress of my seedlings as they transition from this new station to the garden.
Curious about what I’ll be planting? Don’t miss my Starting Onions from Seeds. These plants require some extra care when starting from seed, and I’ve shared my tips for giving them the best possible start.
Why This Plant Station Matters
Creating this plant station is more than just a fun DIY project; it’s an investment in my gardening success. Here are some of the key benefits:
Better Environment Control
Seedlings are delicate and need specific conditions to thrive—consistent light, airflow, and temperature. This station allows me to provide all of that in a dedicated space without interference from daily household activities.Efficiency and Convenience
With the timers and automated setup, I can maintain a consistent light schedule without having to think about it. Everything is in one place, organized, and easy to manage.Scalability
The shelving unit has multiple tiers, so I can grow a variety of seedlings simultaneously. Whether it’s vegetables, herbs, or flowers, I have the space to nurture everything I want for the upcoming season.A Strong Start for the Growing Season
Healthy seedlings mean healthy plants in the garden. By giving them the best possible start indoors, I’m setting myself up for success when it’s time to transplant them outside.
Excitement for the Growing Season
I’m beyond excited to see this project come to life and start using the plant station. Soon, I’ll be sowing seeds for my favorite vegetables, herbs, and flowers, watching them sprout and grow strong in their new home.
This setup represents more than just a functional upgrade; it’s a reflection of my commitment to improving my gardening skills and enjoying the process along the way. I can already picture the lush, vibrant seedlings filling the shelves, ready to take on the world (or at least my garden!).
If you’ve been thinking about setting up your own seed-starting station, I highly recommend it. Repurposing items like a shelving unit is a great way to save money while creating something that works perfectly for your needs. Add some grow lights, timers, and airflow, and you’re ready to grow!
Stay tuned for updates as I document my seed-starting journey and share tips and tricks along the way. Here’s to a successful and bountiful growing season ahead!
Resources:


Starting Onions from Seed
This post contains affiliate links. This means I may earn a small commission if you make a purchase through these links, at no additional cost to you. As an Amazon Associate (or other affiliate program), I earn from qualifying purchases. I only recommend products I personally use and love. Thank you for supporting Grown on a Hill!
Why It’s Worth the Effort
When it comes to growing onions, many gardeners opt for sets—a quick and convenient method. However, starting onions from seed offers unique advantages that make it worth the extra effort. From a wider variety of choices to healthier, more robust plants, starting from seed ensures a rewarding experience and a bountiful harvest. In this post, we’ll explore the benefits of growing onions from seed, walk through the seed selection process, and provide step-by-step instructions to get your onions off to a strong start.
Why Grow Onions from Seed?
Growing onions from seed may require more time and planning, but the benefits far outweigh the effort. From broader variety options to improved yields, here's why it's worth considering:
Better Yields and Larger Onions
Through personal experience, seed onions have consistently produced larger bulbs and higher yields compared to onions grown from sets. This is likely because seeds allow onions to develop a robust root system from the start, leading to healthier and more productive plants.
Access to a Wider Variety of Onions
Onion sets are often limited to a small selection of yellow, red, and white varieties. Seeds open up a world of possibilities, including sweet, pungent, and heirloom onions, such as Walla Walla, Red Burgundy, or Ailsa Craig.
Stronger, Healthier Plants
Onions started from seed are less prone to bolting (premature flowering) and tend to store better. They adapt to their growing environment right from germination, resulting in resilient plants that thrive throughout the season.
Cost-Effective and Sustainable
A single packet of seeds can yield hundreds of onions, making it an economical choice compared to sets. Plus, seed-grown onions can often be saved for future planting, further reducing costs.
Choosing the Right Onion Seeds
Selecting the right onion seeds is crucial for success. Here are some tips to guide your decision:
Understand Your Growing Zone
Onions are categorized as long-day, short-day, or day-neutral varieties.
Long-day onions require 14-16 hours of daylight, making them ideal for northern regions.
Short-day onions thrive in southern areas with 10-12 hours of daylight.
Day-neutral onions are versatile and grow well in most regions.
Decide on Onion Types
Yellow Onions: Great for cooking, versatile, and long-storing varieties include Yellow Sweet Spanish and Patterson.
Red Onions: Perfect for fresh use in salads, sandwiches, or grilling; try Red Baron or Ruby Ring.
Sweet Onions: Known for their mild flavor, varieties like Vidalia and Candy are excellent for eating raw or caramelizing.
Look for Disease-Resistant Varieties
Choosing disease-resistant seeds helps prevent common issues like onion downy mildew or white rot.
Consider Your Harvest Goals
If you’re aiming for storage onions, look for varieties noted for their longevity. If you prefer fresh onions for immediate use, opt for sweeter, softer varieties.
Step-by-Step Guide to Sowing Onion Seeds Indoors
Starting onions indoors gives them a head start, ensuring they’re ready to transplant once the weather warms. Follow these simple steps to grow onions successfully from seed.
Step 1: Gather Your Tools and Supplies
Before you begin, ensure you have the right tools and materials:
High-quality onion seeds
Seed-starting trays or shallow containers with drainage holes
Seed-starting mix (light, fine-textured, and nutrient-rich)
Plant labels and a marker
Spray bottle or watering can with a fine nozzle
Heating mat (optional, for consistent warmth)
Grow lights or a sunny windowsill
Step 2: Prepare Your Seed-Starting Mix
Choose a seed-starting mix rather than regular garden soil. A light, airy mix ensures good drainage and prevents seedling diseases like damping-off.
Moisten the mix with water until it feels like a damp sponge—not soggy.
Want to learn how to make a seed-starting mix? The Perfect Seed-starting Mix
Step 3: Fill and Label Your Trays
Fill your trays or containers with the moistened seed-starting mix, leaving about 1/2 inch of space at the top.
Use plant labels to mark the onion variety and sowing date. This step is especially important if you’re growing multiple varieties.
Step 4: Sow the Seeds
Make shallow furrows about 1/4 inch deep in the seed-starting mix. You can use a pencil or your finger to create straight rows.
Space seeds about 1/2 inch apart in the furrows to avoid overcrowding.
Lightly cover the seeds with a thin layer of seed-starting mix and gently press it down.
Step 5: Water and Cover
Mist the soil surface with a spray bottle to evenly moisten it without disturbing the seeds.
Cover the trays with a clear plastic dome or plastic wrap to retain humidity. This creates a mini greenhouse effect that encourages germination.
Step 6: Provide Warmth and Light
Place the trays in a warm location, ideally between 65-75°F. A heating mat can help maintain consistent temperatures.
Once the seeds germinate (in 7-14 days), remove the plastic cover and place the trays under grow lights or near a sunny window.
Onions need 12-16 hours of light per day. Use a timer to automate the lighting schedule.
Step 7: Thin the Seedlings
When seedlings reach 2-3 inches tall, thin them by snipping the weaker plants at the soil line, leaving about 1 inch of space between the strongest seedlings. This prevents overcrowding and ensures healthy growth.
Step 8: Maintain and Harden Off
Water seedlings consistently, keeping the soil evenly moist but not waterlogged.
Once seedlings are 4-6 inches tall and the outdoor soil is workable, begin hardening them off by gradually introducing them to outdoor conditions. Start with 1-2 hours of outdoor exposure per day, increasing the time over a week.
Why January/February is the Best Time to Start Onion Seeds
Onions have a long growing season, making January or February the ideal time to start seeds indoors. By giving your onions an early start, you’ll have well-established seedlings ready for transplanting when the weather warms in spring. This timing ensures larger, healthier bulbs at harvest.
Final Thoughts
Starting onions from seed requires patience and care, but the rewards are significant. You’ll enjoy a greater variety of onions, stronger plants, and better storage options. By following these steps and tips, you’ll set yourself up for a successful onion-growing season. Whether you’re growing sweet, pungent, or specialty varieties, the effort you invest in January or February will pay off in a flavorful, abundant harvest.


Seed Starting Journey for 2025
Onions, Artichokes, Parsley, and Chives in Zone 5
As I sit inside, dreaming of warm summer days and lush garden harvests, the cold weather blues are hitting hard. But rather than wallow, I’ve decided to channel my energy into one of my favorite winter activities: starting seeds indoors. It’s the perfect way to bring a little greenery into my life while preparing for a thriving garden come spring. This year, I’m taking on a mix of old favorites and an exciting new experiment. Join me as I dive into seed starting for onions, artichokes, parsley, and chives—right here in Zone 5.
Why Start Seeds Indoors?
Starting seeds indoors has been a game-changer for my gardening. Not only does it give me a head start on the growing season, but it also allows me to choose the exact varieties I want. Garden centers often run out of my preferred options, especially when it comes to onions. Growing from seed ensures I’m not at the mercy of whatever sets are left on the shelf. Plus, there’s something immensely satisfying about nurturing a plant from a tiny seed to a flourishing part of the garden.
For Zone 5, where frosts can linger well into spring, starting seeds indoors is especially helpful. It extends the growing season for plants that need more time to mature, like onions and artichokes. By the time the outdoor soil warms up, my seedlings will be ready to hit the ground running.
The Stars of My 2025 Seed Starting
Onions: My Tried-and-True Favorite
I’ve had great success growing onions from seed in the past, and they’ve become a staple in my garden. Sets may be convenient, but I’ve found that onions grown from seed are hardier and produce better yields. The only challenge is that seeds disappear quickly from garden centers, which is why I’m getting a jump on them this year.
For 2025, I’ve chosen a mix of yellow, red, and sweet onion varieties. These will offer a range of flavors for cooking and storing. Onions are a long-season crop, so they’re one of the first seeds I’ll start indoors. By mid-to-late January, I’ll sow the seeds in trays filled with a fine seed-starting mix, keeping the soil consistently moist and placing the trays under grow lights for 12-16 hours a day.
One tip I’ve learned over the years is to trim the onion seedlings when they get too tall. Keeping them at about 3 inches encourages strong, sturdy growth and makes transplanting easier.
Artichokes: My New Experiment
This year, I’m venturing into uncharted territory with artichokes. These Mediterranean natives aren’t typically grown in Zone 5, but I’m excited to take on the challenge. With proper care and an early start, I’m hopeful they’ll thrive.
The variety I’ve chosen is ‘Imperial Star,’ which is bred for annual production in cooler climates. I’ll start the seeds indoors in late January or early February, as artichokes need a long growing season. The key will be mimicking the conditions they’d experience in their natural habitat. Artichokes require a period of chilling (vernalization) to encourage flowering, so once the seedlings are a few weeks old, I plan to move them to a cooler area—around 50°F—for 10-14 days. After that, they’ll go back under grow lights to continue their development until it’s safe to plant them outside.
It’s a bit of an experiment, and I’m prepared for some trial and error. Even if they don’t produce a huge harvest, the silvery foliage alone will add a striking element to the garden.
Parsley: The Persistent Performer
Parsley is a garden staple I rely on heavily for cooking. It’s easy to grow and thrives in a variety of conditions, making it a no-brainer to include in my seed-starting lineup. For 2025, I’ll be growing both flat-leaf and curly varieties.
Parsley is slow to germinate, often taking 2-4 weeks to sprout, so starting early is essential. To speed things up, I’ll soak the seeds in water overnight before sowing them. I’ll plant the seeds in small trays and keep them warm—around 70°F—until they sprout. Once they’ve emerged, I’ll move them under grow lights and thin the seedlings to ensure each one has enough space to thrive.
Parsley is a biennial, meaning it produces leaves in the first year and flowers in the second. While I usually treat it as an annual, I’m considering letting a few plants overwinter this year to enjoy the flowers, which are a favorite of pollinators.
Chives: The Reliable Herb
Chives are a must-have in my garden. Their mild onion flavor is perfect for garnishing dishes, and their purple flowers attract bees and other beneficial insects. Chives are also perennial, meaning they’ll return year after year, making them a valuable addition to my garden.
Starting chives from seed is straightforward. I’ll sow them in early February, lightly covering the seeds with soil and keeping the trays warm and moist until they germinate. Once the seedlings are established, I’ll thin them out and transplant them into individual pots. By the time the weather warms up, they’ll be ready to move into the garden or stay in containers on the patio.
My Seed-Starting Setup
A successful seed-starting operation relies on the right tools and environment. Here’s how I’m setting up for 2025:
Trays and Pots: I’ll use seed-starting trays with cells for smaller seeds like parsley and chives, and larger pots for artichokes to give them room to grow.
Seed-Starting Mix: A lightweight, fine-textured mix ensures good drainage and aeration for delicate seedlings.
Grow Lights: Since winter sunlight isn’t enough, I’ll use full-spectrum LED grow lights, keeping them a few inches above the plants and adjusting as they grow.
Heat Mats: For seeds that need extra warmth to germinate, like parsley, heat mats will keep the soil at a consistent temperature.
Labeling: To avoid confusion, I’ll label each tray with the plant name and date sown. It’s a small step that saves a lot of headaches later.
Looking Ahead to Spring
As I nurture these seeds indoors, I’m already imagining how they’ll transform my garden. Onions will provide the base for countless meals, parsley will add fresh flavor to everything from soups to salads, and chives will offer both beauty and utility. And then there’s the artichokes—my wildcard for 2025. Will they produce those stunning, edible buds I’ve admired in pictures? Only time will tell, but the journey alone is worth it.
Starting seeds is more than a practical task; it’s a hopeful act. It’s a reminder that winter will eventually give way to spring, and with it, the promise of a garden brimming with life. So here’s to 2025 and the adventure of growing—one seed at a time.
What seeds are you starting this year? Are you experimenting with anything new or sticking to tried-and-true favorites? I’d love to hear about your plans in the comments!

Resources:

Building Our Sustainable Compost Bins:
A Step-by-Step Guide
At Grown on a Hill, we believe in sustainable living and making the most of what we have. Composting is a fantastic way to recycle garden and kitchen waste into nutrient-rich soil for our garden. Recently, we embarked on a project to build our compost bins, and we’re excited to share the process with you!

Why Compost?
Composting transforms organic waste into a valuable soil conditioner that can help your garden thrive. It’s an eco-friendly way to reduce waste and recycle nutrients back into the soil. Here’s why we love composting:
Reduces Waste: Keeps garden and kitchen waste out of landfills.
Enriches Soil: Adds essential nutrients and improves soil structure.
Saves Money: Reduces the need for chemical fertilizers.
Planning and Materials
Before diving into the construction, we did some planning. Here’s what we used:
Materials:
Wooden pallets (for the structure)
Chicken wire (to keep everything contained)
Hinges (for easy access)
Screws and nails
Tools: Hammer, saw, drill, staple gun
Step-by-Step Construction
1. Design and Layout
First, we sketched out our design. Our compost bin would have three sections to allow for easy rotation of compost material.
2. Gathering Materials
We sourced wooden pallets and chicken wire locally, ensuring our project was as sustainable as possible.
3. Building the Frame
We started by constructing the frame using the wooden pallets. Here’s how:
Base: Laid out pallets to form the base.
Walls: Attached pallets vertically to create the side walls. Ensured they were securely fastened using screws.
4. Adding Chicken Wire
To keep the compost contained, we stapled chicken wire to the inside of the pallets. This step is crucial for maintaining airflow while keeping everything in place.
5. Installing Hinges
For easy access, we added hinges to one side of each bin. This allows us to open the bins and turn the compost easily.
6. Final Touches
We ensured all parts were securely fastened and made any necessary adjustments to the structure. The bins were now ready for use!
First Use and Maintenance
With our compost bins ready, we started adding our garden and kitchen waste. Here are some tips for maintaining your compost bin:
Balance Browns and Greens: Alternate layers of green waste (vegetable scraps, grass clippings) and brown waste (dry leaves, paper).
Aerate Regularly: Turn the compost every few weeks to ensure proper aeration and faster decomposition.
Keep Moist: The compost should be as moist as a wrung-out sponge.
Benefits We’ve Observed
Since setting up our compost bins, we’ve noticed several benefits:
Reduced Waste: We’ve significantly cut down on the amount of waste going to the landfill.
Cost Savings: We’ve saved money on fertilizers and soil conditioners.
Join Us on Our Composting Journey
We hope this guide inspires you to start composting if you aren’t already. Building a compost bin is a rewarding project that contributes to a more sustainable lifestyle. If you have any questions or tips to share, we’d love to hear from you!
Happy composting!


The Perfect Seed Starting Mix:
How to Create Your Own
This blog post contains affiliate links. This means if you click on the link and make a purchase, I'll receive a small commission at no extra cost to you. I only recommend products I've used and believe in, and any earnings from these links help to support the continued maintenance of this blog. Thank you for your support!
Creating your own seed starting mix is a simple yet impactful step in your gardening journey. By using a blend of coco coir, vermiculite, and perlite, you provide your seeds with the ideal environment to germinate and grow into strong, healthy seedlings. Not only is this mix cost-effective and customizable, but it also gives you the satisfaction of knowing you're giving your plants the best possible start.
As you move forward with your seed starting endeavors, stay tuned for our upcoming blog posts. We'll dive into how to use your homemade seed starting mix with seed trays and soil blockers, ensuring that your seeds have the perfect home to sprout and thrive. These techniques will further enhance your gardening skills and bring you one step closer to a lush, productive garden.
The Importance of Seed Starting Mix
A high-quality seed starting mix is the foundation of a successful garden. It plays a crucial role in the germination process and the early growth of seedlings. The right mix provides the ideal environment for seeds to sprout and develop into healthy, robust plants.
Moisture Retention: Seeds need consistent moisture to germinate. A good seed starting mix should retain enough water to keep the seeds hydrated but not so much that it becomes waterlogged. Excess moisture can lead to fungal diseases like damping-off, which can devastate your seedlings.
Aeration: Oxygen is vital for seed germination and root development. A well-aerated mix allows air to circulate around the seeds and roots, preventing suffocation and promoting strong, healthy root systems.
Drainage: Proper drainage is essential to prevent water from pooling around the seeds and seedlings. A mix with good drainage ensures that excess water is removed, reducing the risk of root rot and other water-related issues.
By providing the right balance of moisture, aeration, nutrients, and drainage, a quality seed starting mix creates the perfect environment for seeds to germinate and seedlings to thrive. This early support sets the stage for a bountiful harvest and a beautiful garden.
Benefits of Making Your Own Mix
Creating your own seed starting mix offers several advantages that can enhance your gardening experience and improve the success rate of your seedlings. Here are some key benefits:
Cost-Effectiveness: Store-bought seed starting mixes can be expensive, especially if you're starting a large number of seeds. By making your own mix, you can save money and still provide your seeds with a high-quality growing medium.
Customization: Different plants have varying needs when it comes to soil conditions. When you make your own mix, you have the flexibility to adjust the proportions of ingredients to suit the specific requirements of your seeds. This can lead to better germination rates and healthier seedlings.
Quality Control: By selecting and mixing your own ingredients, you can ensure that your seed starting mix is free from harmful chemicals and pathogens. This is especially important if you're aiming for an organic garden.
Sustainability: Making your own mix allows you to choose environmentally friendly and sustainable materials, such as coco coir, which is a renewable resource. This not only benefits your garden but also contributes to the health of our planet.
Learning Experience: The process of creating your own seed starting mix can be a valuable learning experience. It provides an opportunity to understand the role of different components in seed germination and plant growth, deepening your gardening knowledge.
By making your own seed starting mix, you gain control over the quality and composition of the medium your seeds will grow in. This can lead to more successful germination, healthier seedlings, and a more bountiful garden.
Ingredients for the Perfect Mix
Creating the perfect seed starting mix begins with selecting the right ingredients. Each component plays a specific role in ensuring the ideal environment for seed germination and growth. Here are the key ingredients for a balanced seed starting mix:
Coco Coir: Coco coir, made from the fibrous husks of coconut shells, is an excellent base for a seed starting mix. It has a remarkable ability to retain moisture while also providing good drainage and aeration. Coco coir is also environmentally friendly, as it's a renewable resource and a sustainable alternative to peat moss.
Vermiculite: Vermiculite is a natural mineral that expands when heated. It's included in seed starting mixes for its ability to retain water and nutrients. This property ensures that seedlings have access to moisture and essential nutrients for longer periods. Vermiculite also helps to create a light and fluffy texture in the mix, which promotes root growth.
Perlite: Perlite is a volcanic glass that has been heated and expanded to create lightweight, white granules. It's added to seed starting mixes to improve drainage and aeration. Perlite prevents the mix from becoming too compacted, allowing roots to grow freely and preventing waterlogging.
When combined in equal parts, coco coir, vermiculite, and perlite create a seed starting mix that is well-balanced in terms of moisture retention, nutrient holding capacity, drainage, and aeration. This mix provides a supportive environment for seeds to germinate and for seedlings to develop strong root systems.
Step-by-Step Guide to Creating Your Mix
Creating your own seed starting mix is easy and rewarding. Follow these steps to prepare a batch of the perfect mix for your seedlings:
Moistening the Coco Coir:
Coco coir usually comes in a compressed block. Start by slowly adding water to the block, allowing it to absorb and expand.
Break apart the moistened coco coir using your hands or a garden tool until it's fully fluffed up and free of lumps.
Mixing the Ingredients:
Measure equal parts of the moistened coco coir, vermiculite, and perlite.
Place all three ingredients in a large mixing tub.
Use your hands or a garden tool to mix the ingredients thoroughly, ensuring an even distribution.
Adjusting Moisture:
Check the moisture level of the mix. It should be damp but not waterlogged.
If the mix feels too dry, add a little more water and mix again. If it's too wet, you can add more of the dry ingredients to balance it out.
Storing the Mix:
If you have leftover mix, store it in an airtight container or a sealed bag.
Keep it in a cool, dry place until you're ready to use it again.
By following these steps, you'll create a seed starting mix that provides the ideal environment for your seeds to germinate and thrive. This homemade mix is a key ingredient in starting your garden off on the right foot and setting the stage for a bountiful harvest.
Creating your own seed starting mix is a simple yet impactful step in your gardening journey. By using a blend of coco coir, vermiculite, and perlite, you provide your seeds with the ideal environment to germinate and grow into strong, healthy seedlings. Not only is this mix cost-effective and customizable, but it also gives you the satisfaction of knowing you're giving your plants the best possible start.
As you move forward with your seed starting endeavors, stay tuned for our upcoming blog posts. We'll dive into how to use your homemade seed starting mix with seed trays and soil blockers, ensuring that your seeds have the perfect home to sprout and thrive. These techniques will further enhance your gardening skills and bring you one step closer to a lush, productive garden.
Resources:


Designing Your Dream Garden
A Step-by-Step Guide
Imagine stepping into your backyard and being greeted by a lush mosaic of vegetables, the air filled with the scent of fresh earth and the promise of nourishment. This isn't just a dream; it's a canvas awaiting your touch. Designing your dream vegetable garden is an artful journey that combines planning and passion to create a space that's both productive and personal. It's about transforming a patch of ground into a cradle of abundance that feeds both your body and soul. In this guide, we'll walk through the practical steps to lay the groundwork for a thriving garden that's a reflection of your dedication and love for gardening. Whether you're a seasoned green thumb or a budding gardener, these steps will help you build a garden that's tailored to your space, resonates with your aesthetic, and yields a bountiful harvest. Let's begin the journey of bringing your dream garden from the fertile ground of imagination into the beauty of reality.

Step 1: Assessing Your Space
Your journey to a dream garden begins with understanding the canvas you have to work with. Every space, no matter its size, holds potential. Here’s how you can assess yours:
Know Your Zone: Climate dictates what will thrive in your garden. Use the USDA Plant Hardiness Zone Map as a guide, but don't forget to factor in microclimates unique to your yard.
Sun Mapping: Plants need light, but not all require the same intensity. Observe how sunlight falls in your space throughout the day. Mark out areas that receive full sun, partial shade, and full shade.
Soil Savvy: Your soil is the foundation of your garden. Test its pH and nutrient levels, and get familiar with its texture—whether it’s sandy, loamy, or clay-heavy. Your local extension office or garden center can help with testing kits and amendments.
Space Analysis: Measure out your garden area, considering any existing structures or obstacles. A simple garden hose can outline potential beds, while stakes and strings can mark paths and features.
Accessibility: Ensure you can easily reach every part of your garden for maintenance. Beds should ideally be no more than 4 feet wide, so you can access the center from either side without stepping into them.
Companion Analysis: Consider how the garden elements will interact. For instance, tall plants can provide shade for lower-growing, shade-tolerant species. A little planning can prevent future conflicts and promote beneficial companionships.
Armed with this knowledge, sketch a rough blueprint of your garden, noting key factors like sunlight and access points. This will not only help with selecting the right plants but also in placing them where they'll thrive, setting the stage for a garden that's both lush and practical.
Step 2: Choosing the Right Plants
Selecting the right plants is not just about what you want to grow, but what can grow. Aligning your garden choices with the practicalities of your environment ensures a lush, productive garden. Here’s how to make those choices wisely:
Climate Considerations: Begin with plants that are known to thrive in your climate zone. They will be better adapted to local conditions and more likely to succeed.
Soil Matters: Your soil test results will guide you in choosing plants that will thrive in your soil's pH and nutrient profile. If you're in love with a plant that's not suited to your soil type, consider creating a raised bed with the appropriate soil mix.
Space Savvy: Understand the mature size of plants to ensure they have enough room to grow without overcrowding. This will reduce competition for nutrients and lessen the risk of disease.
Sunlight Sync: Match your plants to the areas of your garden with the appropriate amount of sunlight. Full-sun vegetables like tomatoes and peppers will not thrive in shady spots.
Edible Landscaping: If space is at a premium, consider edible landscaping. Many vegetables, like rainbow chard or purple kale, offer aesthetic beauty as well as nourishment.
Successive Planting: To maximize your space and yield, plan for successive planting. Once one crop is harvested, have another ready to take its place. Fast-growing greens can fill in gaps between slower-growing vegetables.
Biodiversity: Plant a mix of species to create a balanced ecosystem. This can deter pests and diseases and may reduce the need for chemical interventions.
Personal Preferences: Lastly, grow what you love to eat! There’s nothing more satisfying than harvesting and enjoying the fruits (or vegetables) of your labor.
With your list of potential plants, refer back to your garden map. Visualize where each plant might go, considering its needs and how it will fit into the overall design. The right plants, in the right place, make for a garden that is a joy to tend and to behold.
Step 3: Companion Planting in Your Vegetable Garden
Companion planting is an age-old practice that leverages the natural affinities and relationships between plants. By placing certain plants in close proximity, you can boost your garden’s health and yield without the need for chemical fertilizers or pesticides. Here’s how to incorporate companion planting into your garden design:
Understanding Companions: Some plants have beneficial effects on each other, improving growth, deterring pests, or enhancing flavor. For example, marigolds repel garden pests and beans release nitrogen into the soil, benefiting neighboring plants.
Mapping Your Mates: Create a companion planting chart or map as part of your garden planning. Identify which plants are friends (like tomatoes and basil) and which are foes (such as beans and onions).
Planting Patterns: Instead of large blocks of a single vegetable, intersperse compatible plants. This polyculture approach can result in a healthier, more resilient garden.
Trap Cropping: This strategy involves planting a crop that pests prefer, away from the main garden, to lure them from your vegetables. For example, planting nasturtiums can draw aphids away from your veggies.
Flowers and Herbs: Interspersing flowers and herbs among vegetables can attract beneficial insects, like pollinators and predators of common pests. Lavender and yarrow, for example, are excellent for attracting good bugs.
Temporal Companions: Some plants may not be spatial companions but are great temporal companions. Plant fast-growing radishes among slower-growing carrots. The radishes will be ready to harvest by the time carrots need more space.
Succession Planting: Following one crop with another can improve soil health and make the most of your space. Once peas are done in early summer, plant a crop that benefits from the enriched soil.
Height Harmony: Taller plants can provide shade for shorter, shade-tolerant plants during the hottest parts of the day. For instance, tall corn stalks can shelter lower-growing lettuce.
Companion planting is both an art and a science, bringing a harmonious balance to your garden’s ecosystem. With thoughtful planning, your vegetable garden can be a thriving community of plants that work together, creating a robust and productive environment.
Step 4: Maximizing Efficiency and Productivity
An efficient vegetable garden is one that maximizes yield in the space you have, reduces labor, and extends the growing season. Here’s how to ensure your vegetable garden works as smart as it works hard:
Optimal Plant Spacing: Use square foot gardening or intensive planting methods to get the most out of your available space. Proper spacing can prevent waste, minimize weed growth, and ensure each plant has the resources it needs to thrive.
Vertical Gardening: Make use of vertical space with climbing varieties of vegetables and vertical support structures like trellises or stakes. This can increase yield per square foot and make harvesting easier.
Soil Enrichment: Incorporate organic matter into your soil to improve fertility. Composting, cover crops, and green manures can naturally enhance soil health, leading to more robust plants and better yields.
Timing is Everything: Learn the right time to plant each vegetable variety, taking into account factors like temperature, day length, and moisture. Using succession planting and catch cropping can keep your garden producing continuously.
Irrigation Efficiency: Set up an irrigation system that delivers water directly to the plant roots, such as drip lines or soaker hoses. This conserves water and ensures plants get moisture where and when they need it.
Mulching: Apply mulch around your plants to retain soil moisture, regulate soil temperature, and reduce weed growth. Organic mulches like straw or shredded leaves also add nutrients to the soil as they decompose.
Pest and Disease Control: Employ integrated pest management strategies by planting pest-resistant varieties, encouraging beneficial insects, and using barriers like row covers to protect your crops.
Harvesting Hacks: Harvest regularly to encourage further production. For crops like herbs and leafy greens, cutting them back can stimulate new growth, giving you multiple yields from a single plant.
By implementing these strategies, you can create a highly productive vegetable garden that’s easier to maintain and provides a bountiful harvest. Remember, the most efficient garden is one that aligns with your lifestyle and gardening preferences, making the most of your time and space.
Cultivating Success in Your Vegetable Garden
In the symphony of gardening, every step you take is a note that contributes to the harmony of your vegetable garden. From assessing your space to choosing companionable plants, creating a productive layout, and maximizing the efficiency of every square foot, the process is as rewarding as the harvest.
Remember that your garden is a living canvas—subject to change, growth, and the whims of nature. Embrace the learning curve; each season brings its own lessons and opportunities for growth, both for your plants and for you as a gardener.
Take time to enjoy the journey of gardening. Let your garden be a space of exploration, where you can trial new methods, plants, and layouts. Your patience and persistence will be rewarded with the sights, scents, and flavors of a garden that is uniquely yours.
As you implement these steps and watch your dream garden come to life, share your progress, experiences, and questions with a community of fellow gardeners. Together, we can cultivate not just gardens, but a greener world—one seed, one plant, and one garden at a time.
We invite you to continue this journey with us at Grown on a Hill, where you’ll find more tips, tricks, and stories to inspire your sustainable living adventures. Dig in, get your hands dirty, and grow your dream garden into a reality.
Resources:
USDA Plant Hardiness Zone Map:
https://planthardiness.ars.usda.gov/

Choosing the Perfect Spot for Your Vegetable Garden
Embarking on the journey of creating a vegetable garden is an exciting endeavor that promises fresh produce, a deeper connection with nature, and the satisfaction of nurturing life from seed to harvest. However, the success of your garden starts long before the first seed is planted; it begins with selecting the perfect spot. The right location can make all the difference in the growth and productivity of your vegetables. In this blog post, we'll explore the essential factors to consider when choosing the ideal location for your vegetable garden. From understanding the importance of sunlight and soil quality to considering water access and future expansion, we'll guide you through the process of evaluating potential garden spots to ensure a bountiful harvest. So, grab your gardening gloves, and let's dive into the art of selecting the perfect spot for your vegetable garden!

Understanding Your Garden's Needs
To ensure a bountiful harvest, it's crucial to understand the fundamental needs of your vegetable garden. These include adequate sunlight, good soil quality, and easy access to water. Let's dive into each of these elements:
Sunlight
Vegetables thrive in sunlight, with most requiring at least six to eight hours of direct sunlight each day. Sunlight is essential for photosynthesis, the process by which plants convert light into energy for growth and fruit production. To determine the sunniest spots in your yard, observe the area at different times of the day. Look for spots that receive uninterrupted sunlight, avoiding areas shaded by buildings, trees, or fences. If you're unsure, a sun calculator or a simple time-lapse observation over a few days can provide clarity.
Soil Quality
The foundation of a successful vegetable garden lies in its soil. Vegetables prefer well-draining soil, rich in organic matter, with a balanced pH level. To assess your soil's quality, start by checking its drainage. After a rain shower or watering, observe how quickly the water absorbs. If puddles linger for hours, you may need to improve drainage or consider raised beds. Additionally, conduct a soil test to determine its pH and nutrient levels. This will guide you on any necessary amendments, such as adding compost or lime to adjust pH levels.
Water Access
Consistent watering is vital for vegetable gardens, especially during dry spells. Ensure your garden spot is within easy reach of a hose or a water source. This convenience will make it easier to maintain a regular watering schedule, which is crucial for seed germination and the overall health of your plants. If possible, consider installing a drip irrigation system for efficient water delivery directly to the plant roots, reducing water waste and the risk of diseases associated with overhead watering.
By addressing these essential needs, you'll create an optimal environment for your vegetable garden to flourish.
Certainly! Here's the content for the section "Evaluating Potential Garden Spots":
Evaluating Potential Garden Spots
Finding the perfect spot for your vegetable garden involves a bit of observation and evaluation. Here's how to assess different areas in your yard for their suitability:
Observing Sun Patterns
As mentioned earlier, most vegetables need six to eight hours of direct sunlight daily. To identify the best spots, observe your yard at different times throughout the day. Note which areas receive the most consistent sunlight. Keep in mind the changing seasons; the sun's path may vary, affecting the amount of light certain spots receive. If possible, use a sun calculator tool or create a sun map of your yard to get a more accurate picture of sun exposure.
Testing Soil Drainage
Good drainage is essential to prevent waterlogged roots, which can lead to plant diseases. To test the drainage in potential garden spots, dig a hole about a foot deep and fill it with water. Check the hole after an hour; if the water has drained, the spot has good drainage. If water remains, consider improving the area's drainage by adding organic matter or creating raised beds to elevate the plants above the wet soil.
Considering Proximity to a Water Source
Your garden needs to be conveniently located near a water source for easy watering. Assess how far each potential spot is from your hose or irrigation system. If a spot is ideal in terms of sunlight and soil but far from a water source, think about how you'll transport water to the area. Will you need to invest in additional hoses, or is a new irrigation system feasible? The easier it is to water your garden, the more likely you'll maintain a consistent watering schedule.
By carefully evaluating each potential garden spot in your yard, you'll be better equipped to choose the best location for your vegetable garden. Remember, a little extra time spent in planning can lead to a more productive and enjoyable gardening experience.
Considering Other Factors
In addition to sunlight, soil quality, and water access, there are other important factors to consider when choosing the perfect spot for your vegetable garden:
Proximity to the House
Having your garden close to the house offers several advantages. It makes it easier to monitor your plants, quickly spot any issues, and attend to them promptly. A garden that's visible from a window or a frequently used area of your home is more likely to receive regular attention. Additionally, proximity simplifies tasks like harvesting, watering, and transporting tools or compost, making garden maintenance more convenient.
Protection from Pests
Pests and wildlife can pose a significant threat to your vegetable garden. When selecting a spot, consider the area's vulnerability to common garden pests like rabbits, deer, or insects. Look for natural barriers or think about installing fencing or netting to protect your plants. Companion planting and the use of organic repellents can also help deter pests while maintaining a healthy garden ecosystem.
Room for Expansion
As you plan your garden, think about your future gardening goals. Selecting a spot with room for expansion allows you to scale up your garden as your skills and interests grow. Consider the potential for adding more beds, extending your growing season with a greenhouse, or incorporating fruit trees or berry bushes in the future. Planning for expansion ensures that your garden can evolve with your gardening ambitions.
By taking these additional factors into account, you'll choose a garden spot that not only meets your immediate needs but also supports your long-term gardening vision.
Making the Final Decision
Choosing the perfect spot for your vegetable garden is a crucial decision that can impact your garden's success. To make an informed choice, consider the following key points:
Sunlight: Ensure the spot receives at least six to eight hours of direct sunlight daily, as most vegetables need ample sunlight to thrive.
Soil Quality: Look for well-draining soil, rich in organic matter. Consider conducting a soil test to assess its pH and nutrient levels.
Water Access: Select a location with convenient access to a water source to simplify watering tasks.
Proximity to the House: A garden close to your home allows for easier monitoring, maintenance, and harvesting.
Protection from Pests: Consider the area's vulnerability to pests and wildlife, and plan for protective measures such as fencing or companion planting.
Room for Expansion: Think about your future gardening goals and choose a spot with potential for expansion.
Once you've evaluated each potential spot based on these factors, weigh the pros and cons of each. Consider the practicalities of maintenance, the ease of access, and the long-term potential of each location. Don't rush your decision—take the time to observe and reflect on how each spot aligns with your gardening needs and aspirations.
Ultimately, the perfect spot for your vegetable garden is one that balances sunlight, soil quality, and water access with your convenience and future gardening plans. With careful consideration, you'll be well on your way to creating a thriving and productive garden.

Garden Planning
Resources:

Sowing the Seeds of Summer: A Tomato Lover's Journey
In the heart of winter, as frost still kisses the windowpanes, my mind drifts to the taste of sun-ripened tomatoes, bursting with flavor and warmth. Tomatoes have always been the cornerstone of my garden, offering not just sustenance but a kaleidoscope of colors, shapes, and flavors that transform each meal into a celebration of summer.

Growing my own tomato plants from seed has not only deepened my connection to these beloved fruits but has also proven to be a cost-effective way to cultivate a wide variety of tomato varieties, including some of my favorite hybrids that can be quite pricey as seedlings at the garden center.

Delightful Diversity: A Tomato Lover's Seedling Adventure
In 2024, my tomato adventure continues with some exciting new additions to my lineup. Join me as I share my journey of starting 250 tomato plants, including two newcomers to my garden, Wisconsin 55 and the Yellow Pear. I'll also be nurturing familiar favorites like Mortgage Lifter, Beefsteak, Roma, and Sunny Boy, each offering its own unique taste and culinary possibilities.
This year, my tomato-growing ambitions are bigger than ever. I plan to produce an abundance of stewed tomatoes and tomato soup, building on the success of last year's harvest. Additionally, I'm aiming to expand my tomato production to include homemade ketchup and BBQ sauce, adding a flavorful twist to my pantry staples.
As I embark on this tomato-growing season, I'll be sharing tips and insights on how to successfully start tomato seedlings, along with my experiences and lessons learned along the way. Join me on this tomato-filled journey, and together, let's cultivate a garden brimming with tomato goodness!
Tips for Success in Starting Tomato Seedlings
Start Early: Tomatoes require a longer growing season, so starting early gives them ample time to grow strong before transplanting outdoors. Aim for 6-8 weeks before your last frost date.
Use Quality Seeds: Invest in good-quality seeds from reputable suppliers. This ensures better germination rates and healthier seedlings.
Provide Adequate Light: Tomato seedlings need plenty of light to grow well. If starting indoors, use grow lights or place them in a sunny south-facing window.
Maintain Optimal Temperature: Keep the soil temperature around 70-80°F (21-27°C) for best germination. A seedling heat mat can help maintain consistent warmth.
Use a Good Seed Starting Mix: Use a well-draining, sterile seed starting mix to prevent diseases and provide the right environment for seedlings to thrive.
Water Wisely: Keep the soil consistently moist but not soggy. Overwatering can lead to damping-off disease.
Transplant Carefully: When transplanting seedlings into larger containers, handle them gently to avoid damaging the delicate roots.
Harden Off Before Transplanting: To acclimate seedlings to outdoor conditions, gradually expose them to sunlight and outdoor temperatures before transplanting into the garden.
Support Growing Plants: As your tomato plants grow, provide support with stakes, cages, or trellises to prevent them from bending or breaking under the weight of the fruit.
Monitor for Pests and Diseases: Keep an eye out for signs of pests or diseases and take appropriate measures to protect your plants.
Starting tomatoes from seed can be a rewarding experience, and with these tips, you'll be well on your way to a bountiful tomato harvest!

Burpee SuperSeed Seed Starting Tray Review: Elevate Your Seed Starting Game
This blog post contains affiliate links. This means if you click on the link and make a purchase, I'll receive a small commission at no extra cost to you. I only recommend products I've used and believe in, and any earnings from these links help to support the continued maintenance of this blog. Thank you for your support!
Greetings, fellow gardening aficionados! As we embark on the journey of a new gardening season, I am thrilled to share my firsthand experience with a game-changing tool – the Burpee SuperSeed Seed Starting Tray. Whether you are a seasoned horticulturist or just dipping your toes into the world of gardening, this review aims to shed light on why the Burpee SuperSeed Tray is an indispensable asset for cultivating thriving seedlings.
Unveiling the Overall Experience:
In my quest for tools that promise success, the Burpee SuperSeed Seed Starting Tray emerged as a star player. Its soft food-grade silicone bottom not only facilitated seamless transplanting but also added a touch of finesse to the entire process. The ingenious number and letter system further elevated my seed-starting game, bringing a new level of organization to my gardening endeavors.
The Unrivaled Features:
What sets the Burpee SuperSeed Tray apart is its commitment to sustainability. Unlike its plastic counterparts that serve as onehit wonders, this tray stands the test of time, making it an eco-friendly choice. The flexible yet robust design enabled effortless seedling extraction and uppotting, eliminating the hassle associated with traditional trays.
Alphanumerical Labeling and Plant-o-Gram Diagram:
The alphanumerical labeling and the Plant-o-Gram diagram turned out to be a brilliant solution for organizing my seedlings. Initially unsure about the format, I devised a system using recipe cards with corresponding numbers. Each card was associated with a specific tray, allowing me to easily document the seeds I started, days to germination, and overall tray progress. This method proved incredibly efficient, providing a clear and organized way to manage multiple plant varieties in one tray.
Watering System Design:
The molded corner slots and deep channels in the watering tray weren't immediately noticeable, but their impact was evident in the results. With bottom watering, only two cells showed any signs of damping off, and the roots grew strong and reached the bottom of the cells. The raised perimeter edge effectively contained water, preventing spills during tray handling. The side handles enhanced convenience, allowing me to lift and move the entire cell pack for daily seedling checks and excess water removal.
Transplanting Process and Soft Silicone Cells:
The soft food-grade silicone cells made the transplanting process remarkably easy. The ability to pop specific seedlings from the bottom without any cracking or damage showcased the flexibility of these cells. This feature significantly reduced stress on the seedlings. For successful transplanting, I found that allowing the cells to be slightly moist but not completely dry worked best. I typically bottom water and then waited a day or two before proceeding with the transplanting step.
Cleaning and Reusability:
Cleaning the seed trays after transplanting was a breeze, especially with the soak-and-brush method. Allowing the cells to soak in warm water and using a bottle brush ensured a thorough cleaning process. While I haven't utilized the top shelf dishwasher safe feature yet, I plan to do so this year for added convenience.
Seed Starter Tips:
Following the seed starter tips, especially regarding starting times for vegetables like peppers and tomatoes, has been crucial. Despite my eagerness to start seeds early, planning for the space needed for large planters indoors became a key consideration. Starting certain varieties earlier, even before the average last frost date, allowed me to have robust plants ready for the spring transition to outdoor planters.
Burpee's Commitment and Guarantee:
Burpee's commitment to the success of gardeners has been evident in the quality of their products. While I haven't needed to utilize their guarantee due to a lack of issues, the assurance of their commitment adds an extra layer of confidence in choosing their gardening supplies.
Navigating Challenges and Drawbacks:
While the Burpee SuperSeed Seed Starting Tray proved to be a standout performer, one notable challenge surfaced – the absence of a built-in humidity dome. This presented a concern, especially for delicate seeds that thrive in a controlled humidity environment. However, challenges often lead to innovative solutions, and in this case, overcoming the humidity hurdle became an opportunity for improvement.
To address this, I implemented a strategic approach in my indoor greenhouse. Recognizing the importance of maintaining optimal humidity levels for successful germination, I incorporated seed germination heat mats and fans into my setup. This dynamic duo played a crucial role in achieving unparalleled germination rates that exceeded the benchmarks set in previous years.
The Role of Seed Germination Heat Mats:
Seed germination heat mats became an integral part of my seed-starting arsenal. Placed beneath the Burpee SuperSeed Tray, these mats provided a consistent and gentle warmth essential for seed germination. This controlled heat not only compensated for the lack of a humidity dome but also stimulated quicker and more uniform sprouting, setting the foundation for robust seedlings.
Harnessing the Power of Fans:
In tandem with the heat mats, the strategic use of fans became a key component of my indoor greenhouse setup. Fans played a dual role – ensuring proper air circulation and addressing potential humidity issues. The gentle airflow helped prevent the buildup of excessive moisture around the seedlings, minimizing the risk of fungal diseases and damping off. This harmonious balance of warmth from the mats and controlled airflow from the fans created an optimal microclimate for seed germination.
Results Beyond Expectations:
The combined efforts of seed germination heat mats and fans not only compensated for the absence of a humidity dome but surpassed expectations. Unparalleled germination rates were achieved, leading to healthier and more vigorous seedlings compared to previous years. This experience highlighted the adaptability of the Burpee SuperSeed Tray – a testament to its compatibility with tailored solutions for specific gardening challenges.
In navigating the challenge of the missing humidity dome, the journey unveiled not just a workaround but an enhancement to the seed-starting process. This creative solution underscores the versatility of the Burpee SuperSeed Tray and showcases how challenges can be transformed into opportunities for improvement and innovation in the gardening journey.
A Symphony of Seeds:
The versatility of the Burpee SuperSeed Tray has become the cornerstone of my seed starting endeavors, offering a harmonious platform to nurture a diverse array of seeds. As I reflect on the past successes, this year's plans are brimming with excitement and a desire to explore the full spectrum of possibilities this remarkable tray has to offer.
Tomato Extravaganza:
This year, my seed-starting symphony will feature a multitude of tomato varieties, each bringing its unique flavor profile and characteristics to the garden. From the classic heirlooms to the vibrant cherry tomatoes, the Burpee SuperSeed Tray will serve as the nurturing stage for these tomato stars. The alphanumerical labeling system will once again prove invaluable as I document and track the progress of each variety, ensuring a well-orchestrated garden.
Bell Peppers in Full Spectrum:
Bell peppers, with their vibrant colors and diverse flavors, will also take center stage in this year's planting symphony. From the sweet and mild to the fiery hot, the Burpee SuperSeed Tray's flexible and reusable design will provide the perfect environment for these pepper seeds to flourish. The ease of transplanting with the soft food-grade silicone cells will contribute to the seamless growth of a pepper medley destined for my culinary adventures.
Blooms of Petunias:
Expanding beyond the realm of vegetables, the Burpee SuperSeed Tray will be the canvas for a stunning display of petunias. Their vibrant colors and delicate blooms will add a touch of elegance to my front yard. The tray's ability to accommodate different seed types, from the relatively large tomato seeds to the fine petunia seeds, underscores its versatility, making it an ideal choice for a diverse range of plants.
Innovation in Seed Starting Plans:
As I plan for this year's seed-starting extravaganza, the Burpee SuperSeed Tray will be at the forefront of innovation. Experimenting with new varieties, testing the limits of its versatility, and pushing the boundaries of traditional seed-starting methods will be the theme for the upcoming season. The alphanumerical labeling system will not only keep me organized but also serve as a canvas for documenting the unique characteristics and growth patterns of each plant.
Embracing the Dynamic Companion:
In embracing the dynamic companion that is the Burpee SuperSeed Tray, my seed-starting journey becomes a symphony of growth, diversity, and innovation. The tray's resilience, flexibility, and efficient design make it an indispensable tool as I aim to cultivate a garden that is not just a collection of plants but a flourishing orchestra of nature's wonders.
As the seeds germinate, sprout, and eventually flourish into vibrant plants, the Burpee SuperSeed Tray will stand as a testament to the success of a gardener who dared to explore, experiment, and orchestrate a symphony of seeds in the garden.
The Burpee SuperSeed Seed Starting Tray is not merely a tool but a catalyst for elevating your seed starting endeavors. Its reusable and durable design, coupled with efficient bottom watering, positions it as a beacon of innovation in the realm of seed starting trays. As I gear up for the 2024 gardening season, I eagerly anticipate continuing my horticultural journey with these trays and expanding my collection to include new sizes. For those seeking to transform their seed starting experience, I wholeheartedly recommend incorporating the Burpee SuperSeed Tray into your gardening arsenal.
Here's to a flourishing garden and a bountiful harvest! Happy gardening!